Thursday, 13 February 2014

Knitted Puff Daddy pouffe footstool - DONE!

I know, it might not be pc to call a pouffe a pouffe but in the same manner that fairy cakes have always been fairy cakes then squashy footstools were always called pouffes. I can't remember if it was the chicken or the egg that came first with this. Anyway a Puff  Daddy is a Very Fast Make! I think I had admired the Puff Daddy made up on Clicky Needles' blog or did I see the Sirdar Indie yarn in the exact colours of our curtains and cushions as bargain of the day on Get Knitted's website and then went looking for a knitted footstool pattern?
It was the colour combos in the yarn that did it. There were 13 balls left at sale price, and although the pattern called for 20 balls equivalent, I calculated I'd be OK with 13.
I cast on at Knit and Natter at Get Knitted on Friday 31st Jan 2014 and finished the knitting on Sat 1st Feb and sewed it up and stuffed the blooming thing on Sunday 2nd Feb. A record make, I wasn't knitting that much either!!
The Puff Daddy pattern is not overly taxing, but stuffing it is. For British knitters of a certain age (in your 40s at least) then you can liken the process to wrestling with Big Daddy and Giant Haystacks on a Saturday afternoon! The pattern is to cast on 35 stitches, knit tripled in garter stitch until the yarn runs out. As I had two thirds of the yarn I decided to knit with two strands, on 15mm needles, it worked out fine. Sew up the short seam and run running stitch around the bottom and draw up, shove in an old duvet rolled up and a pillow down the middle to fill it out a bit and I felt like I had gone 10 rounds with Frank Bruno! With a great deal of huffing and puffing and pummelling I finally managed to get a sort of cylindrical ball shape.

Now I can knit with my feet up, total cost £25 as opposed to £80-£150 on trendy websites.

PS I have been delaying posting this to take some better pictures but as it hasn't stopped raining for 2 months I have given up, so here is Puff Daddy

Saturday, 1 February 2014

Brioche for breakfast

Brioche for breakfast
Fresh home made brioche for breakfast is so easy with a bread machine. I have had one for 15+ years and very rarely buy bread as it takes 2 minutes to weigh out the ingredients, as I go to bed, so we wake to a fresh loaf in the morning. I always feel like I am cheating, and not an ethical hands-on baker, but we eat fresh preservative free bread that is a lot healthier/tastier and cheaper than bought. Panasonic are the best bread makers, my first/ current one is 12+ years old (Panasonic SD-252), and I really really want one with a raisin dumper but the basic model just keeps on going! Previous to that I had 3 different cheap ones that all lasted 1-2 years, two were replaced twice under guarantee.

I have known Karen for years on twitter, we have never met, but she owns a beautiful award winning Hopton House B&B on the Shropshire/Welsh borders that I'd love to stay at one day. Her tweets, about the funny side of her life as a BnB landlady, keep me amused. However, it is her pics and descriptions of the breakfasts she serves her guests that always make me drool. Karen is kind enough to share many recipes and I stashed away her brioche recipe and make it in muffin tins as she advises. So here is her recipe, with the brands I use for failsafe bread:

Hopton House Karen's Orange Brioche recipe

1tsp Dove's Farm Quick Yeast (the packets are orange and 125g of yeast lasts a couple of months, keep in fridge in an air tight container, sold in Waitrose)
400g White bread flour (Waitrose Essential Strong White Bread Flour gives brilliant results and is reasonable price for great quality)
1 tsp salt
4 tblspn sugar
Finely grated zest of an ornage
100g butter roughly diced
4 eggs lightly beaten
80ml milk
Extra milk or egg yolk for wash

At least 3 hours before bedtime layer the ingredients in the bread machine pan in the order they are given and put into the machine and set the machine going on the regular dough setting , which takes 2 hours 20 mins on my setting. Go off and knit for a couple of hours!

Once the machine has played its part remove the dough and knock back and divide into 10-12 portions. this is easier said than done as it is VERY sticky! Do not be tempted to add too much flour. Shape and fill a greased 12 hole muffin tin. I weigh them out so they are even.

Place the muffin tin in a carrier bag and "puff up" and tuck the handles underneath so the dough doesn't stick and has room to rise without drying out. Place the tin in the fridge or cold place (garage, cellar, larder) to rise, or prove, overnight. This slow proving makes for holier holes and a very light texture.
The first peep at your brioche dough in the fridge the following morning
Brioche ready for the oven
The next morning pre heat fan oven to 180 degrees C. Carefully wash the brioche tops with milk or egg and bake for 12-15 mins. Cool for 5 minutes on a wire rack and serve with even more butter and home made jam.
Brioche fresh out of the oven
A lovely variation is to enclose a square of chocolate in the dough balls before baking, and you have your own home made pain au chocolate! Sainsburys Basics plain chocolate is fabulous for baking.
Close up of open brioche crumb
After breakfast the weather didn't seem as bad as forecast, in fact it was clear blue skies if windy, so we jumped on our bikes and pedalled down to Bristol Harbourside to wander through the Harbourside Market to browse the stalls and have a coffee (him) and Earl Grey Tea (me). It was a very quick 4-5 miles downhill with a following wind so we worked a little harder coming home. We even stopped off and got some groceries in the village Co Op on the way back, how green were we?! My new panniers hold a lot! After packing the panniers the rain returned, luckily it's only a few hundred metres home from the "coop." Leek and potato soup was quickly made with the stock I made from last weekend's roast chicken, and a cosy afternoon of blog writing, knitting and 6 nations rugby has ensued listening to the wind howling and the rain lashing, again.

Here is a sneeky peek at a very quick knitted project I started yesterday at Knit and Natter and I should finish today or tomorrow. The yarn is Sirdar Indie and super bulky, and I am knitting in garter stitch, doubled up, on 15mm needles!

Sunday, 26 January 2014

Sunday sewing...

I have had the sewing machine out for a couple of weeks so I thought I ought to get my table runner finished. I know its hardly started but I have good intentions on a rainy day. Patchwork always looks a mess before pressing.
patchwork table runnet
The colours are subtle, jollying up of the dining room is nearly done. Only 2 months late!

In the background, by my tropical bag, are some limbs from my first Little Cotton Rabbits girl bunny, a pair of stripy legs ending in red Dolly shoes. There is a head knocking about in the bag, all very disconcerting!

Tuesday, 21 January 2014

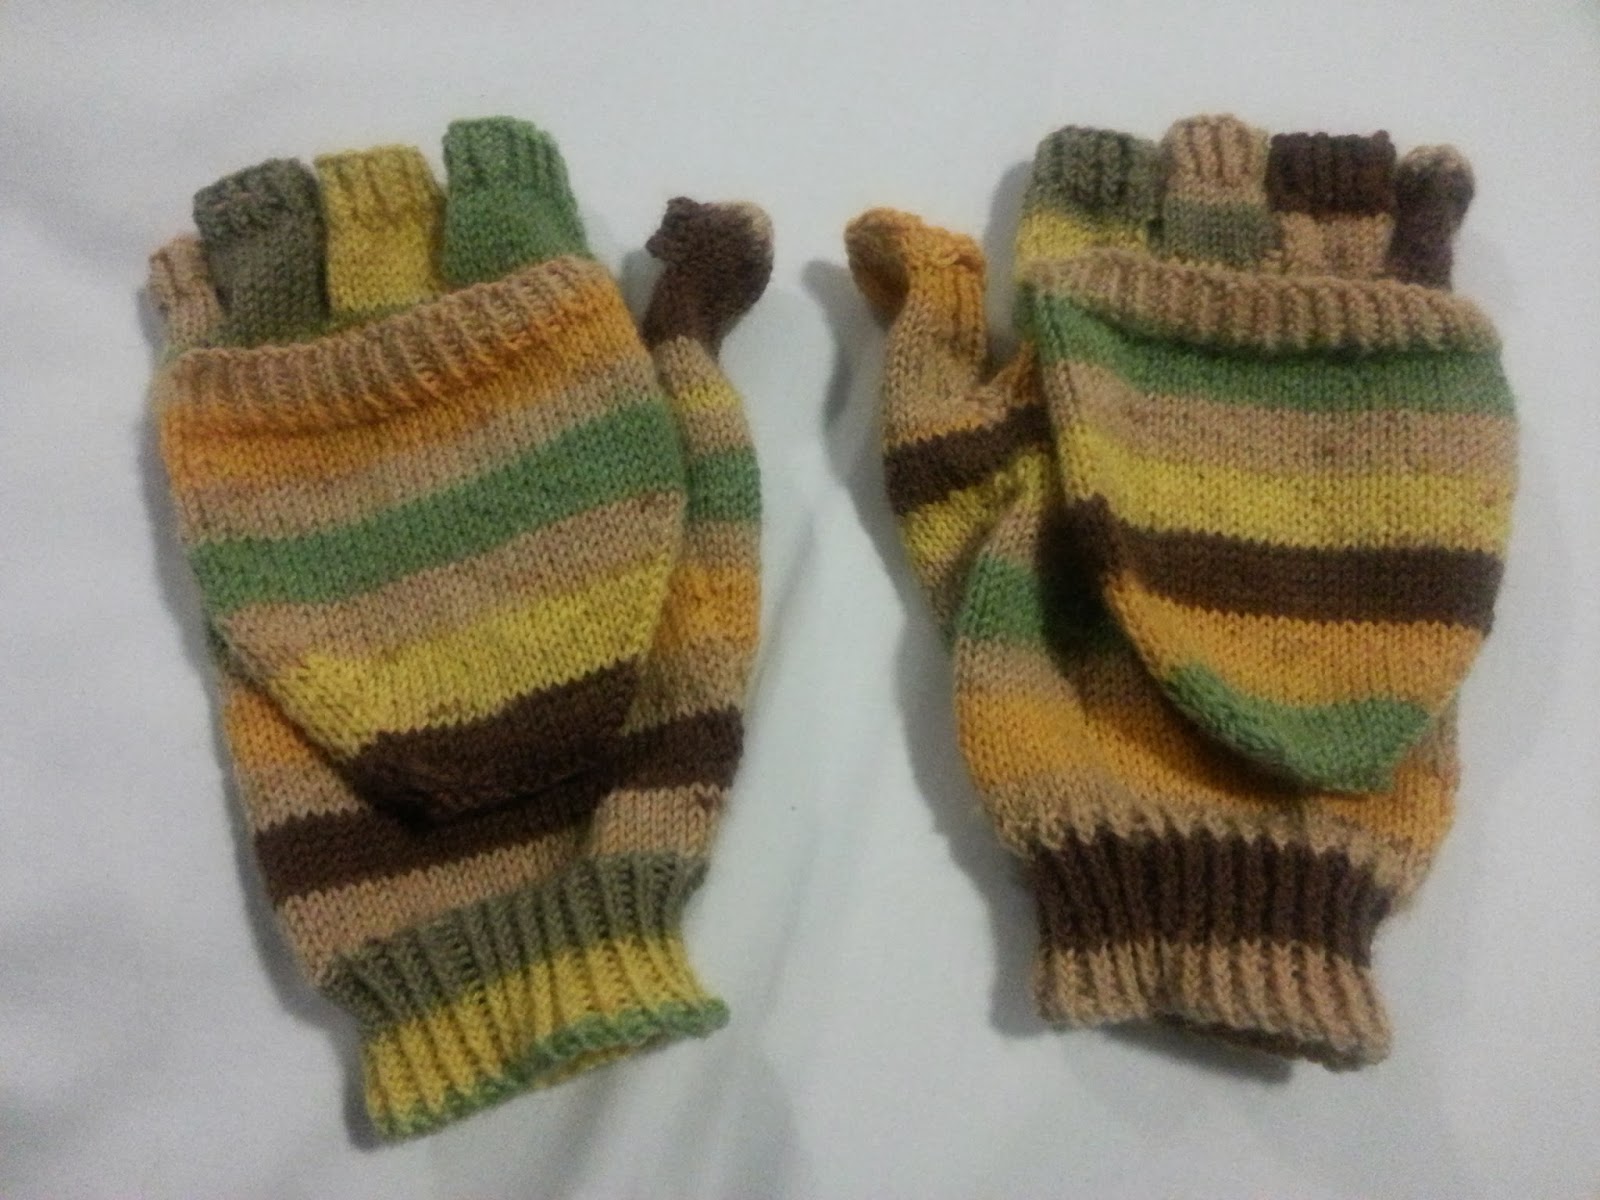
Fingerless Mittens - DONE!

Yes I know mittens are fingerless! However, these are fingerless gloves that convert to mittens. I can never see the point of fingerless gloves as it's the extremities of my fingers that get cold. However,doing anything with gloves or mittens on is impossible. If you have fingerless gloves that convert to mittens then you can do things (like text or fish coins out of purse) and then swiftly pull the thumb and mitten flaps over to keep warm in sub-zero temperatures. Brilliant!
These fingerless mitts are destined for the frozen north aka a student house in Newcastle where you wear gloves with your onesie indoors as well as out but being fingerless is not an option!
 Fast texters need to use their thumb too.
 The flaps don't get in the way when in nimble finger mode.
 ..and now they are mitts for the walk back home at 3 in the morning.
 I didn't match the yarn.
Up close and personal.
 I can see the stitches picked up for the mitten flap quite clearly!
 not the neatest pair of knitted gloves ever, but they were my first attempt.
Knitting them all in the round was a juggle! At times I was totally yarn befuzzled with cocktail sticks everywhere!
...but I did it. now I think another 2-3 pairs are required. One pair in pink for girly youngest who actually admired the concept but not the earthy colours and a pair for me for when I'm on my bike at 6am, so I can still deal with my lights and lock at the other end. Even the husband admired them and suggested some mods so they fit him better! Now that is a first.
One finger one thumb keep moving..
One finger one thumb keep moving.....
One finger one thumb keep moving...........
We'll all be merry and bright!

Fingerless Mittens Podster Gloves finished 18th January 2014 (took a month with Christmas interupting, so a few nights really!)

SIZE: Large

YARN: Schoeller and Stahl Fortissima Mexiko shade 244- 100g ball 4-ply/fingering sock yarn 75% superwash wool/25% nylon As ever. there is enough left for 1 glove or sock so I am glad I bought 2 balls! Purchased from the ever wonderful Get Knitted in Bristol
Pic courtesy Get Knitted, Bristol.
NEEDLES: KnitPro Symfonie 2.5mm dpns

PATTERN: Convertible Mittens Fingerless Gloves Podster Gloves

HAPPY KNITTY INDEX: 8/10 (workmanship needs refining!)

Friday, 10 January 2014

Sock it to 'em - Jolly Socks - DONE!

It's that time of year with too much grey, so as an antidote to greyness meet some jolly bright socks.  Yes I have knitted at long last.
I couldn't find my trusty Opal top down sock leaflet that I normally use, so I Googled and chanced upon Susan Anderson's "How I make my socks" pattern. Perfect. I knitted these when recuperating from debilitating flu back in November, the first week of which I was incapable of knitting even!
This is an Opal 4 ply sock yarn I bought a couple of years ago but it has lost it's band. This pattern was quite intuitive, the ribbing around the heels was different, but the lay out on the needles meant no need for markers, no dropping little rubber loops down the sofa and muttering! I use KnitProSymfonie double pointed needles or dpns, well worth the investment in the one size you use for socks as they don't slip or clickity clack. A friend says she can't abide fiddling around with cocktail sticks but it is easier than it seems once the first round or two is done.
My kitchener stitch still isn't quite right for joining the toes, mine isn't invisible.
 I am most proud of matching the yarn on both socks. I am easily pleased.
Jolly socks have popped off to Holland as they were a Christmas present for my eldest daughter to wear in her boots when cycling in the snow. I just wish I had another ball so the sad third of a ball of yarn left wasn't sitting around. The morale of the tale is to always buy 2 balls of favourite sock yarn and you can make 3 pairs of socks!!

Thursday, 2 January 2014

Retro nautical crochet travel blanket with pom pom border - DONE!

I can't remember when I started this throw, it was sometime earlier this year, probably between April and June. It was a lovely summer and I hooked up a lot of squares outside joining as I went, now it is November and my throw has basically been finished for about 6 weeks but I had to finish off the border, and then I ran out of yarn for the pom pom trim, and then I had to wait for lipstick to come back in stock, then I got ill. Never mind, it is all finished and I am very happy with how it turned out.
It's a throw for the king size bed in our spare room, I thought it could be the traveller's room, whilst en route to wherever our family and friends are off to next. Really it is middle daughter's bedroom as we moved here whilst she was away at university, but her home is still with us whenever she wants to be home. However, the "en route" room was really hit upon because I discovered this gorgeous VW classic camper van fabric and made some curtains.
I made some curtains very badly, I re-did them 3 times, the blackout lining was a nightmare and I was very cross with myself. I only did one curtain for each of the 2 windows, I have not taken close up photos as the workmanship is so bad! Even more annoyingly I cut the fabric incorrectly, and one was too short, so I had to buy another length, the shop I bought it from is very reasonable for make up charges so in the end I spent as much as if they had made them, properly, silly girl.
The colour inspiration for the blanket came from the material, although I added in a couple of extra colours (navy and claret) for some more contrast. As ever I raided my Stylecraft Special DK stash, so I only had to buy an extra ball of each colour, 11 colours in all; 2 reds, 5 blues and 4 neutrals. The squares are classic 4 round granny squares, working 3 rounds and using join-as-you-go aka JAYG on the 4th round. then I sewed in the 2 ends per square very religiously after each half row, I lose the will otherwise. I weave the ends in very thoroughly in several directions before snipping, I wouldn't trust just crocheting them in.


Retro nautical throw finished 22nd November 2013

SIZE: 190cm x 190cm including the border and pom pom trim, 170cm square without

YARN: Stylecraft Special DK weight 100g balls)
#1246 Lipstick      3 balls
#1123 Claret         2 balls
#1203 Silver          2 balls
#1218 Parchment  2 balls
#1005 Cream        2 balls
#1011 White         2 balls
#1302 Denim        2 balls
#1034 Sherbet      2 balls
#1019 Cloud blue 2 balls
#1011 Midnight    2 balls
#1003 Aster         2 balls

HOOK: 4mm

PATTERN: Classic Granny Square so the start of each round is not obvious 4 rounds, JAYG as fourth round.
4ch and sl st to a loop
1st round Work into loop catching tail of yarn as you go
2ch (counts as 1tr) 1tr 1ch *3tr 1ch repeat from * twice more 1tr sl st to 2nd chain from hook to close. sl st to corner space  NB Only one chain space in the corners on the first round
2nd round 2ch (counts as 1 tr) 1tr into corner space 2ch 3tr into same corner 1ch *3tr 2ch 3tr into next corner 1ch repeat from * twice more 1tr sl st to 2nd chain from hook to close sl st to corner space NB Two chains for each corner space now
3rd round 2ch (counts as 1 tr) 1tr into corner space 2ch 3tr into same corner 1ch *3tr into side space 1ch then 3tr 2ch 3tr into next corner 1ch repeat from * twice more then 3tr 1ch 1tr sl st to 2nd chain from hook to close sl st to corner space
4th Round 2ch (counts as 1 tr) 1tr into corner space 2ch 3tr into same corner 1ch 3tr into side space 1ch 3tr into next side space 1ch *3tr into next corner 1ch then JAYG into corner of adjacent square by slip stitching from above 1ch 3tr into same corner space JAYG into next side space from above (NO chain required when JAYG on side spaces) 3tr JAYG into next side space from above  repeat from * once more if 2 edges are being joined JAYG into both corners (so 3tr 1ch JAYG into first corner JAYG into second corner 1ch 3tr  and finish final edge/s as set sl st to close. All squares but the first one on each row are JAYG on two sides.

Granny Cluster Border classic granny clusters, work 3tr into each space but just one 3tr cluster into the JAYG space between the 2 corners, as you can see in the close up below. Also, to stop a wavy border DO NOT WORK A ONE CHAIN SPACE BETWEEN THE CLUSTERS!! I worked 9 rounds changing colour for each round and finishing with lipstick.

Pom Pom or Bobble Crochet Trim
I started a new ball of lipstick for the final pom pom border as it uses the vast majority of a 100g ball, based on this pattern

*sl st to space between clusters
ch 8
tr3tog in 4th ch from hook
ch4
tr3tog in top of prev tr3tog
slst to opp side of base tr3tog in the single stitch to close the bobble
ch4
Repeat from * to end working 2 repeats in corners.

Thanks to Laura and Sue at Get Knitted in Bristol for teaching me this adaptation of the granny square and the pom pom trim adaptation, although I may have changed it slightly from her demo!


HOOKY HAPPY INDEX: 9/10
PS this never got posted in November and December has disappeared but I got there in the end!

Saturday, 14 December 2013

Get Knotted!!

Agghhh, my blog was hijacked a month ago and pop ups pasted cleverly over the template. Hopefully all has been sorted now and I have lots and lots of projects to share....well lots for me anyway, watch this space!

Go get a life and take up knitting you revolting blog-jacker criminal types, channel your creativity for the good of mankind, and not greed!!

Tuesday, 12 November 2013

Autumnal cycling....and cake

I had last weekend off, and was determined to get out on a decent bike ride, not just my 5 mile each way commute to work. I have really enjoyed cycling this summer. I started commuting back in April and steadily increased from twice a week to 4-5 times a week. Not startling but on top of a 39 hour physical shift work job it has been a sense of achievement to get much fitter. Of course the fabulous weather this summer has made it a lot easier. I have now reduced my hours but getting on a bike at just after 6am in the pitch black is also taking some determination. Especially now that it is regularly raining!! The upside is coming home in daylight at lunchtime, with time to do the cleaning knit in the afternoons, and no late shifts.

I bought myself a new bike for my birthday back in August as a reward for my staying power. It has an aluminium frame but is a road hybrid. My old one was a very heavy steel mountain bike. My route is mainly tarmaced cycle path but it can cope with grit paths too. I christened her Gertrude Lush, or Gert Lush for short, the highest form of praise in Bristolian slang! Here she is ready for the commute. She cost me the equivalent of three months of posh gym membership, never mind the saving on fuel=more yarn funds and a fitter me!
We live 3 miles south of Bristol city centre and can get there on cycle paths. My route to work is in the opposite direction across the north Somerset countryside. We are very lucky to have such good cycling routes here as mostly in England the roads are just far too busy and dangerous for cyclists. Bristol has just received funding for the first Dutch style cycle lanes in UK too!

Back to the excursion. OH was booked to play golf on Sunday when the weather was to be stunning, Saturday was forecast to be wet in the morning drying up at lunchtime. For once the weather agreed with the forecasters. Off we went.

We set off towards Bristol on Sustrans route 33 and headed off under the suspension bridge to Route 41, following the south bank of the River Avon from Bristol to Portishead. It was fabulous being off road and the autumnal leaves were stunning, but we could hear the urban existence of cars on the Portway on the other side of the river. After a few miles along quite remote forested path we came out  at a stunning angling lake.
Then out into the open and through the village of Pill. Here we are looking downstream to the west to Avonmouth docks and the motorway bridge....
 ....and in an easterly direction upstream back towards Pill and eventually Bristol.
We're cycling over the motorway bridge in a minute!

 Thank goodness for a big barrier separating us from the thundering lorries heading south on the M5!
We then found our way down to the Portway to follow the cycle lane on the north side of the river back to Bristol, admiring the climbers  climbing in the Avon Gorge. A fairly urban ride overall but very enjoyable.

When we got home, 21 miles later, I iced the cherry and almond traybake, I had made the night before, and we devoured a large hunk with a pot of tea, yum! It has grated marzipan in it and I should have used my brain and washed, dried and floured the halved cherries that were placed on the sponge, before baking, as I normally do to stop them sinking. It tastes good though. I am eating a slice now writing this!
Related Posts Plugin for WordPress, Blogger...