Wednesday, 22 August 2012

A perfectly perfect birthday

I am not too sure I look forward to my birthday as eagerly every year as I used to; the years are galloping too fast for my liking. I was 47 on Monday, “that’s so old” say the 16 and 19yo! I have 4 months each year where I pretend I am a year younger than Mr Knotty…but I always catch up again very quickly. Monday birthdays are not the most sought after, but I was very lucky and had a wonderful birthday thanks to my family. I had bought myself a new sewing machine from our local Cotswold Sewing Machine shop in Stroud back in May, exactly the same offer that was available at the Malvern Quilt Show and online. Even better they repaired the presser foot and serviced my old one for less than £50 so L now has a machine of her own, a very early birthday present for her. If I ever have any problems I will get local service. That was a huge present and I was not expecting anything else, but my girls gave me a day to remember.

Mr Knotty brought me a cup of tea in bed before disappearing for work as usual, unfortunately. S made me breakfast, she really really wanted me to have it in bed but I don’t actually like breakfast in bed, so she served my perfectly cooked scrambled eggs and mushrooms with a pot of tea, OJ and toast and damson jam at the table and was lovely company. A 16yo being up and bright and cheery at 9.30am in the holidays is an honour. She had ordered me one of the crochet books on my “I would really really like but when everything is online you don’t really really need it do you?” list. 200 Crochet Blocks by Jan Eaton, knotty heaven.  Perfect. Flowers from my best friend.
Lovely B-day presents from L and S and flowers from my best friend A
K rang from her house in Holland and we had a lovely chat, and then the postman bought me her present and card on exactly the right day. She had bought me the silver cow charm for my Pandora bracelet. We live 100m from Minchinhampton Common (National Trust) where cows roam all summer, and end up in our garden if they go out on the razzle “downtown” and we forget to put the gate on.
Mr Knotty gave me my bracelet two years ago for my birthday and every charm has been a special present with meaning, perfect.
My Pandora Bracelet
L appeared a bit bleary eyed, she has worked two weeks solid at the supermarket deli, with no days off, so she deserved a lie in, she had turned down overtime to be at home on my birthday as well. I opened the present she proudly gave me, there was a card in an envelope and that was a voucher for a back, shoulder and neck massage. Bliss,  it can be redeemed in the village so I won’t have to go far for my pampering. I am saving that treat for September.

Then I opened the parcel, oh my goodness! She had sewn a beautiful crochet case, in the style of a mini spanner roll, stocked with 12 crochet hooks, darning needles in a case, green spotty scissors and a tape measure.
 She had chosen carefully coordinated fabrics in dusky purples and sage greens with cream and black and a lace loop to close over a rustic button. There are lots of sections for those all important knotty tools.
The best present in the world is something made especially for you with love. It was made totally secretly when I was away in Cumbria two weeks ago, so it was also a total surprise.

I was told I had to stay out of the kitchen in the afternoon, so I crocheted all afternoon, the weather cleared and I sat outside.  All will be revealed soon.
I can't wait to try these blocks out of my new book, I had been thinking about a granny and solid granny square combo, and the bobbles are fantastic!
Carefully timed to be served 20 minutes after Mr Knotty got in at 7, we had a delicious 3 course meal outside that L shopped and cooked for.

To start were French toasts with salmon paté and smoked salmon on a bed of dressed leaves. Main course was chicken breast stuffed with mozzarella, pesto and sun dried tomatoes wrapped in Serrano ham with pan fried potatoes, green beans and pesto sauce. To finish a trio of desserts; warm chocolate fondant, cheesecake and sponge all topped off with fresh raspberry coulis and raspberries. The weather was just cooperative enough to eat outside.

As I said, a perfectly perfect day!

Wednesday, 15 August 2012

Gooseberry Ice Cream with Ginger and Lemongrass Biscuits

gooseberry ice cream
Gooseberry, ginger and lemongrass ice cream with ginger and lemongrass biscuits

The last few days we have been trying to paint the few wooden outside windows we have, the weather has not cooperated and it has been a struggle to get them prepared, primer on where needed and one coat of paint on most of them. The second coat required in the last few places will have to wait. It is pouring with rain again!

A couple of weeks ago I managed to miss the few hot days in the south west as I helped my parents move house in Cumbria (see the story of the gingham cushion). Dad’s gooseberry bushes were dripping in fruit and as they were leaving their freezer behind and a new one would be a few days he said I could have as many gooseberries as I wanted. So I braved the prickles and picked most of them, leaving a good crop of small fruit to ripen for the new owners!

As soon as I was home I open froze them on trays ready for crumbles in the winter. It is very easy to top and tail a pound when frozen, they never make the freezer if you do that job first, I find.

It was still hot for another day so I thought ice cream could be good. The making custard bit is a faff (nice but a faff!) and cream is gorgeous but a bit naughty for every day. So I experimented with low fat fromage frais. I do have an ice cream machine which makes it easier but no problems making this without a machine. It was delicious. Then I got a bit cheffy and decided to make some biscuits too, the results were very satisfying, the biscuits are based on this recipe but I have adapted it. The ice cream is a cross between ice cream, gelato and a sorbet but more of an ice cream than a sorbet!

Gooseberry lemongrass and ginger ice cream with ginger and lemongrass biscuits

Before you start, make sure the ice cream maker bowl has been in the freezer for 24 hours first (if using) and poach the fruit in advance as it has to be fridge cold.

Ingredients

For the gooseberry ice cream:
500g (1lb) gooseberries
100g (4oz or more to taste) sugar
2 tblspns Ginger and Lemon grass Cordial (Bottle Green is the best and local to us, or use the stem ginger syrup and a touch of lemon grass paste)
1-2 balls stem ginger chopped finely
300ml carton low fat (or full fat if preferred) Fromage Frais

For the ginger biscuits:
110g (4oz) butter
1 egg
225g (8oz) Self Raising flour
225g (8 oz) caster sugar
½ tsp baking powder
1tsp ground ginger
1 ball stem ginger chopped finely
½ tsp lemongrass paste

Method

Ice Cream

  1. Poach the gooseberries, cordial, sugar and stem ginger in a covered dish in the microwave for 5-8 minutes on 75% power (or until cooked) stirring half way. If you poach in a pan be careful it doesn't catch as no water is used. Break up lightly with a fork, you do not want whole gooseberries and add more sugar if needed, I like chunks rather than a purée and a tart taste. Cool and refrigerate until needed.
  2. In a large jug mix the chilled gooseberries and fromage frais.
  3. Turn on your ice cream maker and slowly pour the mixture into the bowl (that’s why it is in a jug) and leave the machine to churn until done, 30-45 minutes.
  4. Turn ice cream into a freezer proof container and freeze until needed. 

To serve: remove from freezer and leave at cool room temperature for 30 minute (or in the fridge for 60-90 minutes) before serving. It should be quite soft to maximise flavour.

If you don’t have an ice cream maker pour into a large freezer proof container and freeze for an hour. Mix well with a wooden spoon to break up the ice crystals and freeze again. Repeat 2-3 times and then leave to freeze thoroughly. Follow serving instructions above

Biscuits

  1. Pre heat oven to 150deg fan oven
  2. Melt the butter over a low heat, cool slightly and whisk in the egg then mix in the chopped stem ginger and lemongrass paste.
  3. Sift the dry ingredients into a bowl and add the butter/egg mix.
  4. Mix thoroughly, using your hands if necessary.
  5. Roll the dough into small balls about 2cm across.
  6. Space the balls WELL APART on thoroughly greased trays, I used 3 trays (or line with reusable baking tray liner), and bake for 20-25 mins. If they are still a bit pale after this, turn the oven up a fraction to brown them slightly.
  7. Leave to cool completely on the tray. I love the way the surface cracks like ginger snaps, but they are very slightly chewy.

You can either serve the ice cream formally with biscuits on the side or make an ice cream sandwich with the cookies. It was so good that I made to take to lovely friends who had invited us for dinner. Now they know I didn't spend hours slaving in the kitchen!

Today is not ice cream weather…the middle of the day in the middle of August, in Gloucestershire, and the lights are on and I am making soup for lunch. The dog is not getting a walk in this weather!

Sunday, 12 August 2012

Medallion Flower Tutorial

As Islay Lass has flattered my ego and has asked to see my Medallion Flower pattern here it is. Please visit her blog, she doesn't live on Islay anymore but a slightly warmer island slightly further south, a lovely read.

I wanted a simpler decoration to finish my Tropical Bag so I came up with these medallions.

I am supposed to be painting our only wooden windows, outside on the kitchen and conservatory but obviously 2 dry days was more than our allocated quota. I'm just so relieved I didn’t start on the painting! Hark, I hear thunder, I think the golfing husband may be home early, the common is rather exposed when you have a metal stick in hand.

Just a minute, I need to go and get my mug of tea…
KnitKnatKnotUK Medallion Flower
Medallion Flower
OK here we go, a walk through with photos then an easy to copy and paste regular pattern at the end. I haven’t done this before so please tell me if its gobbledegook. It’s dead easy to crochet, and based on the circle principle from the base of Lucy’s crochet bag pattern. I use UK terminology.

I’m using 2 colours of Rico Creative Cotton that is a light Aran weight and a 4mm hook to make it firm. I’d go down to a 3.5mm if making in double knit. 1 wooden button 3cm and a darning needle thick enough for the yarn. Any button you like with holes and 2-3 cm in diameter would be fine. The finished medallion is 9cm diameter made with trebles or 8cm in half trebles, as I did for the ones on my bag. The tutorial flower is pictured with trebles.

Leaving a good long tail to sew your medallion onto whatever you are using it for later, start with a chain of 4 and slip stitch into a circle.
Round 1 Chain 3 (always counts as 1st treble of the round)
Now make 11 trebles into the circle, holding the tail and crocheting over it. 12 trebles in total counting the 3 chains.
Slip stitch into the 3rd chain to complete the ring.
Pull the tail to close the circle.
Round 2 Chain 3 and 1 treble into 1st treble, and then 2 trebles into every stitch. Slip stitch to 3rd chain again to finish round. 24 trebles.
Round 3 Chain 3 again and 1 treble into same stitch as before. Now 1 treble into next stitch, then 2 trebles into the stitch after that, repeat until you are all the way round, you will finish with one treble and again close the circle with a slip stitch into 3rd chain. You should have 36 stitches.
Round 4 Chain 3 again and 1 treble into same stitch as before. This time you repeat round 2 by making 2 trebles into every stitch again to make a slightly wavy edge. It doesn’t look very wavy now but fear not, it’s more of a ripple effect when sewn on. 72 stitches. Fasten off.
Round 5 (Contrast) Flip your circle, what was the right side is now your wrong side. You should be able to see 3 circles that look like running stitches at intervals.
You now want to work onto the middle round picking up one thread as shown. (They are the outer edge of Round 2) It can be a bit fiddly so no getting cross! Starting anywhere, loop the contrasting colour and work 3 chains and 1 treble into 1 stitch.
Continue working 2 trebles into the next loop all the way round.
I found it easier to hold the rest of the main medallion out of the way. You will finish with 48 trebles, but it’s not critical. Slip stitch to 3rd chain to close and finish off.
That was easy!  Weave in the 3 ends (not the 4th centre one) securely and snip.
flowery medallion
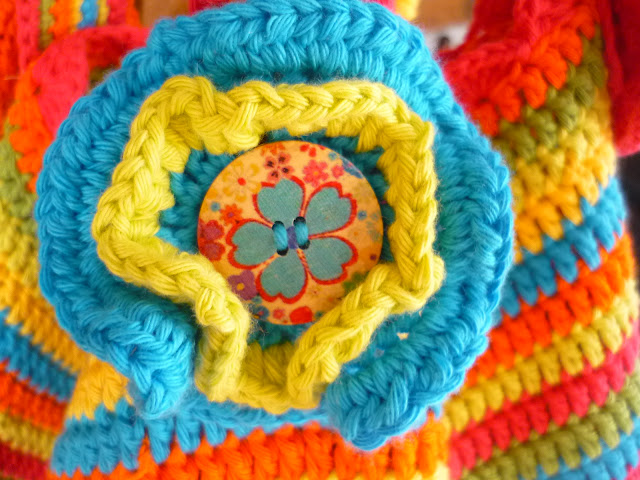
I used a 3cm wooden button with decent sized holes to finish and my darning needle allowed me to sew the button on to the centre before sewing onto my bag. The medallion squishes up nicely once sewn on, it looks worryingly flat and boring on a flat surface before the button is attached, fear not. Finish off very thoroughly!

I like my medallion, a bit more contemporary in a appearance than a ruffly flower, you could make the circle bigger and have several inner ruffles, just always make sure the last round is 2 trebles into every stitch. I made 4 different combos for my bag.
flower medallion motif
Attic 24 Bag
Medallion Flower Pattern

ch=chain
sl-st= slip stitch
tr=treble (dc in US)

4 ch and sl st to circle leaving a generous tail.

Round 1 - 3ch (always counts as 1st tr) 11tr into ring, catching tail as you go. Sl-st to 3rd chain to close. 12 st. Pull tail to close ring, do not cut off.

Round 2 - 3ch 1tr into 1st st, *2 tr into each subsequent st. Repeat from * to end. sl-st to 3rd chain to close. 24 st

Round 3 - 3ch 1tr into 1st st, *1 tr into next st, 2 tr into next st * Repeat from * to * to last stitch 1tr then sl st to 3rd chain to close. 36 st

Round 4 - 3ch 1tr into 1st st, *2 tr into each subsequent st. Repeat from * to end. sl-st to 3rd chain to close. 72 st. Fasten off.

Round 5 (Contrast Round)
Using 2nd colour flip your medallion over and work into the single loop of the middle round of stitches showing (they look like running stitches, and are the outer st of round 2)3ch 1 tr into first loop. * 2 tr into next loop. Repeat from * to end. sl-st to 3rd chain to close. 48st

Fasten off. Sew in outer 2 ends. Using starting tail, sew on your button and sew onto bag, hat or whatever!

I made the medallions for my bag using half trebles, it's slightly smaller just substitute for all trebles if desired. The photo tutorial is using trebles.

©KnitKnatKnotUK A link back to this post would be appreciated if you use and/or like my flower medallion, thank you!

I am really sad that the Olympics finishes today, the closing ceremony should be amazing I would award a medallion flower to every competitor! I reckon they are digging out the Spice Girls.

Is the rain stopping? Can I go and paint? Will it be dry for the next 16 hours? Is the Pope Catholic?!

Friday, 10 August 2012

Tropical Summer Bag

Attic 24 bag
Tropical Lucy Bag

Back in June I had to spend the day in Bristol waiting about for a few hours whilst my 16 yo S had a college trial day, this was not a hardship. I had no desire to go shopping and as I was out in the Brislington area anyway I pre-arranged to go and spend a few hours crocheting at the wonderful Get Knitted. I was working on my Rainbow Ripple blanket! What a lovely yarn shop with friendly and knowledgable staff, I had a squashy sofa to myself, lots of yarny magazines to read, free tea and of course yarn to browse and great company/customer service. Fortunately Get Knitted stock Rico Design Creative Cotton that I had been lusting after, a 100% cotton yarn in Aran weight, perfect for an Attic 24 Lucy Bag. I spent most of the five hours agonising over colour choices, but I plumped for 2 balls each of six colours in the end. My bag will be tropical; Sky Blue, Pistachio, Light Yellow, Orange, Light Pistachio and Fuchsia (more red than pink) I was good and waited until my ripple blanket was finished before embarking on this project, although I only rippled a few rows that day!
Rico Creative Cotton
Rico Designs Creative Cotton; Orange, Lt Pistachio, Pistachio, Sky Blue, Fuchsia, Light Yellow

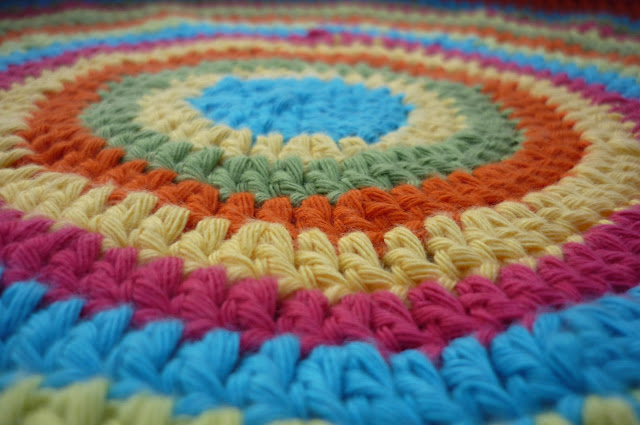
As ever Lucy’s instructions are fabulous, this is the first time I have crocheted circles and it’s so easy. I changed colours every round, and started in a different place each time so the join didn’t become noticeable, but I did find I got a lump at each join from tying off which was hard to work round as the cotton is solid, I got better at disguising as I worked up the bag (you can see some gaps). The outermost olive is the last of the 14 rounds increasing for the base, after that you just keep working round and round.
Not happy with the new yarn joins!
crochet circle
Easy to disguise mistakes with clever photography lol
I have always just looped in a new colour in the past, but on the ripple I knotted at the start of each colour as that is what everyone seems to do nowadays, and I wish I hadn’t. I have gone back to no knots at all and weaving in ends very thoroughly with a needle. On the bag I did crochet over the ends but you still have to thread a needle to run back in another direction anyway so it’s best just to leave the ends I think, and do them properly, with a needle for peace of mind.

Is it a hat?
Do you like my model, should he give up the day job?
I enjoyed making my bag, but working with cotton is harder work, you have to be so careful with each stitch to avoid yarn splitting (where a little partial loop of the previous stitch still remains on the hook) It’s not as stiff finished as I hoped it would be, but I still love it.
In your face stripes, subtle or what!
Bag Straps, just finishing off the last row
I thought it would stand up a little on its own. I probably will line in the future but the bright stripy curtain material I thought I had buried in a trunk seems to have been used for something at some point by a daughter! A good tip I saw was to find a plastic place mat to place in the bottom of the bag, the cork one I put in for photographing won’t be robust enough to use in anger!
Lucy Bag
Finished Bag
Yarn Bag, don't look at the very carefully woven in ends that are escaping already!
I couldn't find the pattern for the flower Lucy uses on her bag to cover the strap joins, which I machined on. I did eventually find it on another page of her blog, but after I had invented my own substitute. I am pretty chuffed with them and will write out the pattern as a tutorial over the weekend if anyone is interested. I call it a Medallion Flower and it turned out like this, with a wooden button sewn in the middle to finish:
Crochet Medallion Flower
Medallion Flower
Medallion Flowers finished off with a wooden button
TROPICAL BAG finished 5th August 2012, it took me about two weeks but that was working on another project at the same time!

FINISHED SIZE: Top of handle to base 60cm, not sagging! Diameter of base 30cm (14 rounds) Height of bag to scallop 30cm, 40 rounds in total including base and 1 round scallop to finish. Strap end to end 65cm for 100 chains

YARN:  2 Balls each Rico Creative Cotton (a light aran weight yarn) I had ½-3/4 ball left of each so if you bought 1 ball in 10 different colours there wouldn’t be much over.
Sky Blue 37
Pistachio 41
Light Yellow 63
Orange 74
Light Pistachio 44
Fuchsia 13

Yarn is available in about 38 very bright and zingy shades, great colours, 85m per ball.

HOOK: 4mm to keep the stitch tight

PATTERNS:
Lucy Attic 24 Bag
Flower Medallion is my own pattern that I have written up as a tutorial.

HOOKY HAPPY INDEX: 8/10

I think she (S age 16) gets her modelling skills from her father, not! Sums up their attitude to my crocheting!!
crochet bag
My finished Tropical Bright "In Your Face" Crochet Bag!

Sunday, 5 August 2012

Rule Britannia!

What a day...the phone rang late on Saturday morning and it was our friends who can call on us on their way home from holiday in Devon to Northants, five of them, puppy and largish caravan! We warned them to park at the top of our street!

I started to bake, the easiest and tastiest ever shortbread and a strawberries and meringue cream Victoria Sponge. It was a miracle I didn’t mess up either as I was dashing back and forth to the living room watching all the amazing Team GB medals come through.  Apparently “to medal” is now an allowed verb according to a programme earlier on good old Radio 4 yesterday.  The Oxford English Dictionary (I think) guy was very careful not to pass opinion but stated dictionary addition/alteration is purely on documented usage by the general population and not academic opinion.  In Great Britain we medal, and we medal Big Time!
Strawberry Cream Meringue Victoria Sponge
Finally our friends arrived after a stressful few hours on the M5 and we all had tea before a lap of the common with their bouncy puppy Jasper who forced Rolo (our 12 year old lab) into a trot, he is happier sniffing in his old age.

I have been making 6 egg Victoria Sponges for a fair few years, my friend Andrea gave me the idea of doubling the size of my normal recipe, and I bought two good quality spring action loose bottomed 9”/ 22cm diameter deep cake tins years ago. I always use St Delia’s (Delia Smith) all in one method and sunflower margarine and extra large eggs at room temperature. Never ever peep in the oven until the last couple of minutes and only then if you are worried it is overcooking, you can tell that when the aroma is very definite! I only trust imperial measurements for this one. Dave asked for the recipe so he could make a cake so here you are Dave!

Classic Party Size Victoria Sponge

Pre heat fan oven whilst making the cake, fan oven 160 degrees, shelves at 1/3 and 2/3rds position

Ingredients

12oz (375g) Self Raising Flour
2 tsps baking powder
12oz (375g) Caster sugar
12oz (375g) Sunflower Margarine  AT ROOM TEMPERATURE (make sure it’s not low fat)
6 extra large eggs (or 7 medium) at room temperature
2tsps vanilla essence (optional)
300ml Whipping cream
200g strawberries
1oz(25g) icing sugar
1-2 meringue nests
2 tblspns Bonne Maman Strawberry Jam (or home made!)
Grease the tins and line the bases

Method

  • Sift flour, baking powder and sugar into large bowl.
  • Add margarine and crack in the eggs and add vanilla essence if using. No need to pre whisk the eggs.
  • Using an electric whisk mix on low speed until the ingredients are just combined, then increase to high speed and mix for one minute only.
  • Divide equally between tins (which translates to 8 very heaped tablespoons dotted around each tin I ) Do not tap spoon to release.
  • Minimal handling and speed into the oven is the secret now.
  • Gently smooth tops leaving a slight hollow in the centre area and raised a bit round the edge.
  • Place a tin on each shelf in the oven and gently shut the door.
  • Bake for 30 minutes. The cake will be light brown and the edges just curling back from the edges, and the centre springs back when pressed lightly with a finger.
  • Leave to cool in tins on cooling racks for 5 minutes and then carefully turn out and finish cooling.
  • Keep the best 7 strawberries back and halve 6 and keep one whole and chop the rest.
  • When cool whip the cream, sift the icing sugar on top and fold in.
  • Put half the cream into another bowl. Fold in the chopped strawberries to one half.
  • Sandwich the cooled cakes with the jam and strawberry cream.
  • Spread remaining cream on to the top and arrange halved/hulled  strawberries and one whole one in the centre.

Serve with a nice cup of tea and cake forks.

It was so lovely to see our friends, but unfortunately they had to get home before dark with the caravan.

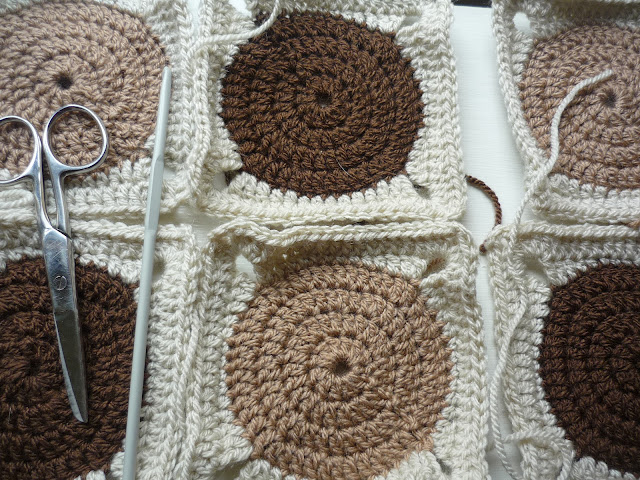
After everyone had left we settled down for some more Olympics. We are hooked…and I hook whilst watching too. On this Super Saturday we won so many medals that I lost count on my Bullseye Square so many times it took me 3 ½ hours to complete a 20 minute square, lost count of the medals too! Spectacular successes in rowing, cycling and especially Jessica Ennis in the Heptathlon, Mo Farrah in 10K and brilliant Greg Rutherford in Long Jump. 6 golds, 1 silver and 1 bronze, in one day, for lil old Great Britain!
Bullseye or Medal Squares!
They look a little like medals!

We can’t cope with any more…Sensational Sunday has seen bronze and silver in men’s gymnastics, the fantastic Ben Ainslie  tactically sailed to Gold in the Finns and Percy and Simpson still won a silver, they didn’t fail at securing a gold.

Oh…and Andy Murray has just smashed Federer into smithereens in 3 sets in the Men’s tennis singles. Gold number 16, 17 or 18?!
So how do us Brits celebrate? Well with tea and cake of course, I'd better get the roast on so we can watch Team GB this evening.

The best result; Ben in the sailing of course, that used to be my sport, the coverage was fantastic as the intricacies of sailing tactics, making a boat go fast, starting and reading the wind and waves and working out who is in the lead is impossible from the shore. Best Olympic Sailor of all time. We are learning to win in this country and not just be polite and take part!

Thursday, 2 August 2012

Crochet gingham cushion

I haven’t really crocheted anything for a gift before (except for the heart bunting) as a lot of people don’t “get” crochet, people can be very dismissive of so called "grannyish" crafts.
Just love the colours!
Tots (or Tottie Limejuice as she is often known) has been a wonderful online penpal of mine for several years, we met on twitter. On “paper” we don’t have that much in common, but we get on like a house on fire. We chat most days, on twitter, Facebook and via email. I hope when we finally meet we don’t burn anyone’s house down! It’s very likely we will do something very daft though.

Tots was a journalist in a previous life, and finds words easy, she has recently Kindle published a book about why and how she moved to France about 10 years ago, called “Sell the Pig”. In her words: "What happens when dementia, depressed dipsomania and downright dottiness decide to uproot from the UK and move to France together?"

Without any self pity, she describes tragic life events but two sentences later you are snorting out loud and holding your sides trying not to wet yourself from laughing so much. Tots works from her remote cottage, or Grottage as she fondly calls it, that she has bought and renovated over the past 18 months, in the heart of the mountainous Auvergne region of France. Her outlook is about 20-30 years younger than her official age, with a dry and very quick sense of humour.  Her two dogs are the best dogs in the world, well I let her think that! Tots has always been there for me the last few years, when either of us have tough times we chat, about the world, his oyster, politics, religion, human and animal rights and the downright dottiness of most the world’s inhabitants.

Tots’ new kitchen is beautifully simple…hand made carpentry by her French artisan carpenter neighbour, and cream and blue wall tiles. Tots is a talented writer, but she freely admits that numbers and sewing/crafting are not her forté . Her mother turns in her grave when Tots thinks about threading a needle to patch her trousers. She is very resourceful, and found some bargain gingham curtains online and asked if I could forward them on, which I gladly did, I have seen pics on Facebook but is it my imagination or for real that there is a rocking chair in there too? There definitely is a wooden deck outside the back door with stunning views.
Tots French Kitchen
Last week was Tots’ very significant birthday, the one where in the olden days you got a bus pass and a pension if you were a “lady.” What do you get someone who has very little but loves her life and her dogs, and has no desire whatsoever for “more”, and works extremely hard at leaving as low a carbon footprint and leading as eco a lifestyle as is humanly possible in the western world?

I have been reading lots of crochet blogs recently, and love this one by Little Tin Bird, I fell in love with Heather's “Bullseye” square which is what I was looking for for a cushion project for our bedroom, but I was distracted by the beautifully simple “Elmer” squares.
First Elmer Square
I quickly knocked up one in Stylecraft Aster that I was using for my ripple throw, and it measured a very satisfying 10cm exactly for 5 rounds. So easy, and almost shaker like in its simplicity, I love numbers, patterns and making things! I then made a Cream one, a Denim one and finally one in Bluebell. An hour (well two really) later I had 9 squares or half a cushion, albeit a little cushion.
A Portable Project!
I had more of the aster so I decide to try a gingham effect to go with Tots' kitchen and made those squares over the next few days, with the centre square Sherbet (or Cloud Blue?) and cream.
Elmer Squares in construction
Time was running out, and my parents were moving house, so I rushed up north to Cumbria to help with the 15 mile move, taking my crochet with me. Instead of a plain back, I carried on with squares and made a random patchwork of 9 different blues and lavenders (very Provençal in style!) I used a 35cm IKEA cushion inner (we all have hundreds of those)  and since both are washable I decided Tots had to wash the whole cushion and dry in the hot sun if a mishaps ever occurs as I had no suitable buttons for an opening. The cushion and cover can be tumble dried on cool but neither of us “does” tumble dryers. I don’t like things to be so “precious” you can’t use them for worry about spills and being dragged through a hedge backwards by a dog. The squares sewed up very quickly using the ends, so that eliminated the dreaded sewing in of most of the ends as well, I liked that efficiency. I sew right sides together but catch the outside loops of each stitch only, and then it doesn’t matter what colour yarn you are using for the join as it doesn’t show, and they lie really flat.
Neat Stitching!
Patchwork Provncal One Side and Gingham Reverse
Two rounds of treble round each of the nine square patch made a 35cm square , I just crocheted the squares together and made the edge in the same process  using treble stitch around three sides in cream then I inserted the pad and continued until it was closed. My husband said that was good for the border (I hadn't left for Cumbria yet!) He is a great believer that when a job is done it’s done, nice and neat no faffing.  Me being me, I wanted to play a little more so I added Attic 24’s very simple picot trim once I was out of his sight oop norf. I think it finished it off stylishly without being frilly or fussy.  You just have to count carefully coming into the corners to jiggle the spacing a little to get round neatly.
Simple Picot Edging
I took a few photos of the finished cushion in mum and dad’s house and garden, on the very last day of 15 years of living there. Mum is also a great gardener, just like Tots, I haven’t inherited those skills! I carefully wrapped the little cushion and posted it from Cumbria to France, with love, a little project like this is also satisfyingly economical to post abroad if wrapped in carrier bags (how glamorous) no danger of breakages! I knew Tots would approve of not giving RM too much money.
Gingham is "Vichy" in French!
Gingham Solid Granny Squares Cushion
Provencal Solid Granny Squares Cushion
Royal Mail and La Poste came up trumps and delivered the parcel on exactly the right significant day, and here it is in its new home.
Gingham Cushion in situ at Tots Grottage!
Provencal side!
I so enjoyed making it that I think a blanket with Elmer squares has to be a future project. Perhaps for Tots next significant birthday in 10 years’ time, I don’t want her getting ideas! Really I’d love to hand deliver next time. One day!

Gingham Solid Granny Square Cushion finished 23rd July 2012, it took me three days as there was a deadline!

FINISHED SIZE: 35cm square + edging, each square was 10cm

YARN:  Oddments of Stylecraft Special 100% acrylic Double Knit in 10 colours, each square is about 15m yarn (left over from my Rainbow Ripple)
Bluebell 1982
Wisteria 1432
Denim 1302
Sherbet 1034
Aspen 1422
Clematis 1390
Aster 1003
Lavender 1188
Cloud Blue 1019
Cream 1005

Hook: 4mm

PATTERNS: Solid Granny Squares (or Elmer Squares) pattern by Little Tin Bird
Picot Edging by Attic 24

HOOKY HAPPY INDEX: 9/10

PS Did you know the French for gingham is "Vichy" which is also where the mineral water comes from, a city close to the Grottage. Gingham is rumoured to have originated in Vichy although there is also likely to be an Indian connection as well. No I didn't know either!
Related Posts Plugin for WordPress, Blogger...