Thursday, 26 July 2012

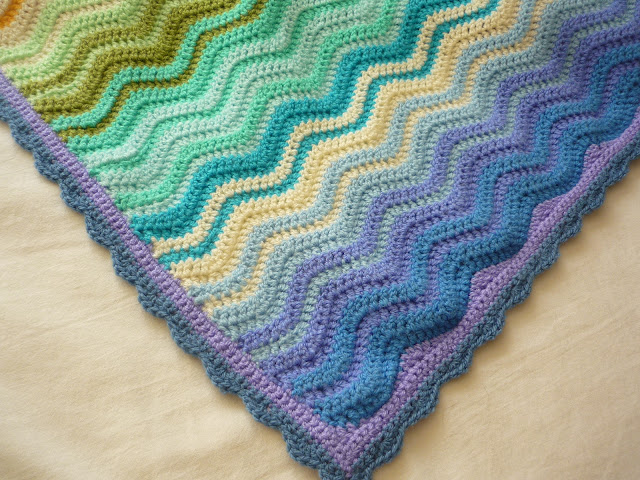
Rainbow Ripple Throw .... done!

Rippling waves......the rhythm and patterns in sand and sea and rippling muscles on those Tour de France thighs.... phwoar! Well the British boys did us proud; Bradley Wiggins, Chris Froome and Mark Cavendish, Olympics next, no pressure. Both types of ripples were inspirations for my rainbow ripple that I completed last week. It was still very cold then and I was keeping warm whilst rippling along with the boys.
Tour de France
Watching Tour de France rippling muscles whilst rippling!
I started my ripple blanket on 27th May 2012, following Lucy's (of Attic 24 fame) iconic neat ripple pattern.  I'll post all the stats at the end!  Here is my diary:

Under way…I bought a 17 ball Stylecraft Special DK Lucy pack and added 5 extra colours and cream, 23 colours! At present I am planning to choose colours as I go, 2 rows old colour, 1 row new colour, 1 row old colour 2 rows new colour (new colour now becomes old colour) etc etc evolving colour wise but not in a true rainbow.
Started with 297 chains 21x14 stitches repeats +3, I think it will be single bed size, hopefully! 1 row down, the hard row, with no problems. Here we go!
I measured on 13.6.12 and the 297 chains are working out to be a width of about 60” or 152cm, and 75 rows are 29” or 74cm, so a cm a row is nice and easy to calculate!) Aster/ Bluebell/ Cloud Blue/ Cream/ Turquoise/ Sherbert/ Aspen/ Meadow/ Spring Green/ Cream/ Saffron so far.
Attic 24 neat ripple
Waves upon waves
5.6.12 Thanks to the extended Jubilee Weekend I have had lots of knotting time :) 40 rows down, I am up to saffron in colour spectrum and as pleased as punch, especially as having to go down the very cheap yarn route doesn’t matter, it feels light and cottony and not at all nasty acrylic! Note the mistake....as we were away for 2 days and I had not brought on colour I still needed a deliberate mistake was worked in, so glaring to me but in the big scheme of things never mind!
9.6.12 Slowed down a little bit, up to Lipstick and about to embark on all the pinks and purples….not at all happy with the Shrimp colour at the moment, thought it would look more orangey.

13.6 Slow and steady progress, a few rows a day. Working on plum rows! I have just measured it out of interest and added dimensions above, I like to know things like that looking at others work so I hope it helps someone.Aster/ Bluebell/ (Denim on 2nd repeat too)/ Cloud Blue/ Cream/ Turquoise/ Sherbert/ Aspen/ Meadow/ Spring Green/ Cream/ Saffron/ Sunshine/ Shrimp/ Matador/ Lipstick/ Cream/ Pomegranate/ Fondant/ Raspberry/ Plum/ Magenta/ Cream/ Clematis/ Wisteria/ Lavendar.
30.6 Just love this, I think two full repeats of the 22 colours will be too much, I do a cream section every five rows and love how this just holds it together. 
Back to Meadow on the second repeat now! It’s getting cumbersome to lug around to crochet in the car whilst waiting for offspring! I got some looks crocheting on the cross channel ferry this week too. At the start of the second repeat, the colours go Aster/Bluebell/Denim (which I forgot first time through) etc as above keeping a cream section after every five colours.
8.7.12 I am up to plum on the second repeat now…so nearly there and torn between desperately wanting to finish and see how the border works (will be simple I think) and not wanting to let it go! Oh well, got to watch Murray this afternoon at Wimbledon, and only 3 more colour repeats and the fill ins to do.
19.7 Aggghhhh run out of denim on the 4th side of the final scallop edging this morning…hoping 2 squares I have made for something else in same colour will yield enough to finish as my local shop has just about every colour in BUT Denim!!I filled the troughs at the ends by Tr2Tog in the dips then a tr then 2 HTR then 2DC then 2 sl st on the peaks then 2 dc 2 htr 1tr Tr2tog then 1tr etc etc etc all in lavendar, then:
2 rounds dc lavendar
1 round dc denim
1 round scallop (right side to finish) denim, same pattern as the crochet pillowcase edge I used before.


I didn’t go round and round the edging but turned for each one, so it lies flat, so 1st round dc was back and last scallp row on right side.
Here come an awful lot of pictures! Really pleased with the edging.
 A riot of colour, "subtle" is not a tag applicable to this ripply crocheted throwy blankety thing!
Is it on to ripple your ripples?
...and finally (as the Two Ronnies would say) here it is finished!!
neat ripple throw
Rainbow Ripple Throw
crochet ripple blanket
crochet scallop border
That's it folks...sad to be finished but oh how so many more hooky projects to embark on.
Rainbow Ripple Throw finished 20th July 2012, took me under two months!

FINISHED SIZE: approx 220x165cm (83"x65") 198 rows

YARN:  100g ball each Stylecraft special 100% acrylic DK in 25 colours

Bluebell 1982 *
Sunshine 1114 *
Wisteria 1432
Raspberry 1023 *
Matador 1010 *
Denim 1302 *
Lipstick 1246
Sherbert 1034
Turquoise 1068
Fondant 1241
Saffron 1081
Aspen 1422
Clematis 1390
Shrimp 1132
Spring Green 1316
Aster 1003
Lavender 1188
Meadow 1065
Plum 1061
Cloud Blue 1019
Pomegranate 1083
Magenta 1084
Cream 1005 * (4 balls, may have used less)
* extra colours not included in the 17 ball "Lucy" pack that many retailers sell or just buy loose! I have plenty left for lots of small projects :)
Bought from Deramores as they had all the colours in stock and a very good special on at the time, great service!

Hook: 4mm

PATTERN: Neat Ripple by Attic 24

HOOKY HAPPY INDEX: 8/10

This blog entry is my submission to the Deramores Blog Awards 2014. Deramores is the UK’s number one online retailer of knitting and crochet supplies.

Friday, 20 July 2012

Apricot Frangipane Tart


I like to bake...I have always baked, I like to eat my baking! It's not normal to have pud more than once a week in our house (not counting yogurt and fruit) but tonight is a little celebration.

Apricots are reasonably priced in the greengrocers at the moment, not quite the same as the mounds you get so fresh and cheaply in the markets in France, but this makes a dozen go a long way! I invested in some Amaretto for just such recipes a long time ago, well worth it. This isn't an original recipe, are any recipes original? It's a mish mash of two or three.

Apricot Frangipane Tart

You will need:

Sweet Pastry
500g plain flour
250g butter
175g icing sugar
1 egg

Frangipane filling
75 g caster sugar
75 g unsalted butter at room temperature
50 g plain flour
150 g ground almonds
2 eggs
1 tsp almond essence (optional)

Apricots
10-12 apricots halved and stoned
275 ml water
200g caster sugar
50 ml amaretto (optional)

Glaze
3 tblspn apricot jam
1 tblspn amaretto (or water)

Method
Pre heat oven to 180 deg C (fan)

For pastry :
Sieve flour and sugar into food processor.
Add cut up butter cut and pulse  in small bursts until fine crumbs then add the egg and briefly pulse until it starts coming together.
Turn out and gently knead together and rest the pastry covered in fridge for 30mins +

Meanwhile poach apricots.  Add sugar to water and amaretto (if using) in a large based pan.
Bring to boil and gently slide in apricots, cut side down, turn heat to low at simmer. Simmer for 4-5 mins, be careful they go mushy quickly!
Remove with a slotted spoon and allow to cool.

For the frangipane filling: cream butter and caster sugar, and add eggs, almonds and flour and beat together (easier to use the food processor that is already dirty!)

Roll out pastry and line tart dish, carefully line with greaseproof paper and baking beans and bake blind at 180 for 6 minutes, remove beans and paper and bake for another 6 minutes.  It’s better to have a baking sheet if using a ceramic dish. Pastry should be dry but barely coloured.

Fill base with frangipane filling and smooth and carefully arrange apricots in concentric circles on top, cut side down starting at the outside.

Bake for around 40 minutes at 160degC (fan)

For the glaze: heat the jam and amaretto or water in a pan or microwave, then sieve. Carefully drizzle on top of warm tart (or brush delicately with a pastry brush, I tend to slop it on) and allow to cool.
Serve with cream, ice cream, crème fraîche or as is!

Eat...that's an order!

Saturday, 14 July 2012

Going Dutch and Crochet Heart Bunting

Tuesday 19th June 2012 was a day that’s had a red star marked on our calendar for a long time, the day of the very last GCSE exam for S, our youngest daughter. Maths it was…..well they are all over now and it’s a long wait until results day in August. Once we knew the very last day date, and what was required in terms of book return day, prom, 6th form trial days etc etc I spied a 6 day gap when in theory we could GO AWAY.
Now this “GOING AWAY” is in capitals as it’s exciting, I am not shouting, because when you have children of school age you cannot go away in June in the UK ever…especially at High School age. So this gap was the first time we have BEEN AWAY IN JUNE (when it is cheaper) in about 20 years. What excitement!

This is the 7th year we have had "big" exams on the trot GCSE, AS or A levels. 2 more years to go (not that I am wishing them away, but the exam time bit I will not miss.) Middle daughter L is home from Uni (she has also gone to Newcastle and just completed her first year) for the summer and she managed to get some time off from work to come to Groningen as well.
Even better than just GOING AWAY was arranging to go and visit our eldest K who has been living in Holland since last July, we saw her last at Christmas. This time last year we were at her graduation in Newcastle, and now we are off to visit her in her house in Groningen, up in the North East of Netherlands and about 30 minutes from the German border. She has been working in a shoe shop saving hard, has passed the higher level Dutch exam required for studying and working in the professions, and is starting her Masters in September. Her Dutch BF is lovely too.

We booked one night in a Premier Inn in Dover on the Wednesday night and a £39 return ferry crossing to Dunkirk on Thursday morning and for once we turned left and not right, we are very regular visitors to France. My crochet comes too, when I am not driving I am a crocheting demon in the car and get very strange looks from the lorry drivers and on the ferry! I was determined to finish some heart bunting as a present for K’s house.
We had a lovely few days, staying at their typically Dutch town house a stone’s throw from the park with a pretty back yard with room to store their bikes. Perfect for the Pimms that she had requested from the UK (cheddar, mustard and sliced bacon were the other requests) It’s an easy bike ride into town, and the buses are so efficient. The weather wasn't brilliant, in fact it was dire for June, but we managed to see Groningen, climbed the clock tower, and not get that wet. 

Fortunately we visited Amsterdam on the Saturday when it was just about dry for the whole day. We enjoyed “the best” Dutch Apple Pie, saw the market and went on a river cruise. Unfortunately all the tickets were gone for Anne Frank’s House when we looked online the previous week; we will have to go back!
It was only the day before that I decided to make the heart bunting on a whim and found Sandra Paul’s cheerful Granny heart Bunting pattern on her inspiring Cherry Heart Blog, thank you Sandra! After a couple of fluffed attempts (me being a dimwit and being pedantic rather than intuitive with the pattern) I got it and was whizzing off hearts every 20 minutes. This is slightly naughty behaviour as really I am in the middle of a ripple throw, and I try not to make more than one thing at once but this was essential, a present is an exception, so I used the Stylecraft Special DK I am using for the ripple, I love this yarn. I thought “cheap” had to be “2nd choice” but not with this Stylecraft, it doesn't feel like the stiff squeaky acrylic that I used on my flowery throw, when working or as the finished item, there is a great colour selection and it washes well as well as being very economical. I made 15 hearts with picot edges and just joined them with a chain and made a loop on each end. I finished 30 minutes before arriving in Groningen and I was all crocheted out for the day. Hopefully they are enjoying their new home!
Sunday was so so wet but K and I visited Groningen Museum, and enjoyed the Yin Xiuzhen exhibition
Even when  your children are 16-22 in age they still love the jungle gym down by the bathing beach, it wasn't swimming weather!
It’s lovely having an excuse to visit the lovely Netherlands regularly now, what a lovely country and welcoming people. Bikes, boats and flowers everywhere! I crocheted my ripple throw in the car all the way home.

Sunday, 8 July 2012

Crochet Flower Throw

The "Flowery Throw" was one of the politer terms my family called this, my first, crochet throw. When I started it in Spring 2009 I was working silly hours running my own business and I really didn't have the time or energy to do anything for myself.
Flower Throw
Flowery Throw and Simple Border
One day I came across the lovely Rosehip Blog (where the sideways distraction of my pillowcase edging also originated) and Beata's crocheted Flower Square caught my eye. I had some acrylic double knit around the house, and a crochet hook so out of interest I crocheted up my first square to see if I could remember how to crochet, the last time was in my teens making granny squares so at least 25+ years ago. I stopped crocheting as there was nothing inspiring pattern wise back then, I remember spending weeks trying to find a pattern somewhere, anywhere, to crochet a sweater, to no avail. Doilies, lace and tablecloths were your lot!
A bit like riding a bike though, you don't forget. Every now and then I would make a little flowery square, every little square had 6 ends. Mostly I crocheted in the car or on the annual family holiday in France. I would make 20 squares in a 2 week spurt, and then none for six months. They lived in a basket and gathered dust, every now and then eyeballs were rolled!

I sold my business last year (I managed to get out quits so no I am not rolling in it....) and started to search for work, the good part was that I finally had some "me" time and I picked up my knitting needles again and finished an aran jacket at the end of the winter. That was an achievement, no problem knitting then! After that triumph I taught myself to knit socks and a couple of simple shawls as presents (with too many mistakes) and I declared myself a yarn addict again after so many years.


I spied my UFO (UnFinished Objects in the crafting world lingo) squares and decided to put my mind to finishing the blanket. At that point I had 60 squares, and 360 ends.
360 ends!!

So I sat down and made myself sew in those ends, and then every six squares I sewed in the ends.

If you stay on top of the ends life is so much better and you don't put off making more squares as you're dreading the ends!!

End of ends.....I have learnt my lesson. Never will I let my ends build up again.
My squares curled though, opinion on Ravelry was that you don't need to block acrylic, so I didn't. I decided I needed a couple more colours of yarn (Stylecraft Special DK) and bought some darker blue, bright yellow and mint green and bemused myself working out permutations and combinations of how many squares I need to do to have all the variations, if there are 10 colours and 3 positions for each colour. That size blanket was too big!

...and we had nice weather back in March and April and I did some crocheting outside, bliss! I decided I would just double crochet (US single crochet) the squares in strips using white and then join the strips in the same way. I stopped at 180 squares (15x12), it's not a large blanket at all after all that effort as each square is only about 8cm (3") 
 It's easier said than done laying out a random pattern, I didn't really succeed as I must have swapped some of my carefully labelled piles as I do have the same colour flowers together in a couple of places.
 We had sun back in May when I was edging! The edging was very quick and painless.
I did have a dither, as you can see the flowers pop one way better than the other but that seemed to me to be the wrong side, so I joined with the curled edge towards me and the white border is now really the wrong side and I wanted that to be the right side, but it's not really a problem as the other side looks good too.
Edging is 3 rounds of double crochet in white, 1 in fucsia, 1 white, 1 lime green, so 6 in total. You can see the difference between the wrong right side and the right wrong side....no I have no idea either which is which so it doesn't really matter!
I've taken these pics today with the vivid setting on my camera, and close up for some of them (the flower macro setting)
crochet flower blocks
Oh look wonky basket under bench in conservatory has coat hangers in for the washing.  I can't do staged photos!
 The flowers do pop better on the wrong side.
 Only one more photo honest!

Flowery Throw finished 25th May 2012, took over three years but less than 2 months once I put my ar*e into gear!

FINISHED SIZE: approx 120x105cm (47"x41") each square around 3" Cot size but not intended for a cot. It's over the back of the bench in the conservatory.
YARN:  A ball each Pale blue, darker blue, lime green, mint green, pale pink, shocking pink, pale yellow, dark yellow, red, cream and a couple of balls of white. All 100% acrylic DK, no idea of usage as I already had most of it. Recommend Stylecraft Special DK.

HOOK SIZE: 4mm

PATTERN: Flower Square

HAPPY HOOKY INDEX: 7/10

PS I now realise how lovely Stylecraft Special DK is for a very economical 100% acrylic yarn, the other colours were stiff and squeaky but the Stylecraft is soft and light and feels like it has some cotton in.  Since there are 50+ colours in the Stylecraft range guess what the next project will be made with? No prizes...

PPS Thank you for humouring me by reading it all and apologies for picture overload. I have been messing about with camera settings.

Monday, 2 July 2012

Crochet Pillowcase Edging

Surfing blogs is a dangerous activity. An activity that results in  spending more time getting distracted by, than actually creating the projects that they inspire! You also end up with a list of "want-to-do" projects a mile long, and as I am  an unorganised blog follower/ bookmarker, I know I have seen an idea somewhere and when I come to find it even more hours are pleasantly wasted getting distracted by even more "must make" ideas!

In this case though, I knew I had seen an idea and I knew where it was. I was in the middle of a three year epic, making a flowery crocheted throw which will be the topic of another "catch up" post soon.  The pattern for the throw I had bookmarked, but in doing so I also spied the lovely pillowcases Beata sells in her Etsy shop on her Rosehip blog. Trouble is you then want to make them yourself and not buy them!  I know wanting is bad, but making your wants makes it OK, doesn't it? Back then I didn't have the time, or know about Ravelry, the most amazing and by far the best knitting and crochet resource on the web. You can find any pattern in the yarn world on Rav!

So I did a Rav pattern search for crochet on "pillowcase edging" and there was a perfect pattern from Cassie at You Go Girl, and Cassie had kindly posted free tutorials. I bought one ball of Rowan Hand Knit cotton, at vast expense, in a gorgeous light olivey green (Celery) shade to coordinate with the IKEA Cath Kidston Rosali pillowcases I had, from buying the material for the Sweet 16 quilt in my first post. Even better, Cassie also acknowledges the inspiration for her design came from the Rosehip Blog, and that is how the love in the blog world goes round!

So I am contemplating edging some pillowcases for said "Sweet 16 (sic) daughter.  


The worst bit by far was straightening out the 15 x "width of pillowcase" length of yarn for blanket stitching, boy did it twizzle. Fifteen times the width, for goodness sake that breaks all the rules of "no longer than half an arm's length" we were taught!!!! It probably took me a couple of hours to do the blanket stitching around the edge as the foundation for the crochet edging, using doubled yarn, and although I thought it was too loose it turns out it should have been looser again as it did pucker when finished.
The crocheting was fine, a lovely straightforward tutorial from Cassie, but I should have searched out a 3.75mm hook as she advised, I was lazy and a 4mm was what I had to hand! I made this on a hot summer’s evening watching the Eurovision Final.
So here is the not very perfect first one, that blanket stitch has to be positively baggy!
Practice makes nearly perfect, the second attempt was much faster and easier, isn't that always the case? I am trying!! The Rowan 100% cotton yarn I used is a bit stiff, I think a softer one would be easier to work, perhaps a bamboo mix as advised.
Back at the end of May the weather was nice..... so I could mess about outside trying to take a decent photo.
...and a close up
This one is better, and many apologies if daisies and buttercups on the lawn offend you, I love them and they are one of the few things that grow for me.
Crochet Pillowcase Edging
The family were rather bemused by the uselessness of my creation but so what..... a touch of "just because you can" every now and then is good for the soul.
...and finally..... I "just" managed 2 pillowcases out of an 85m hank of yarn with 1m spare, so it may be better to go with a slightly bigger ball and/or a slightly lighter weight to be on the safe side if you're after a pair.
Related Posts Plugin for WordPress, Blogger...